- IPsec
- OPENVPN
- IKEV2
- AnyConnect
- L2TP
- PPTP
-
How to setup Mac OS X Built-In Cisco VPN
As an alternative to downloading the Cisco VPN client for Mac OS X, you can also use the built in IPSec version found on your machine. This might be more convenient for those who wish to avoid installing additional software.
You will need an Account in order to access the VPN.
1. Head over to your System Preferences and to the Network Settings.
System Preferences > Network

2. Add a New interface.

3. Input the following settings:
Interface: VPN
VPN Type: Cisco IPSec
Service Name: This can be anything, I left the default.
4. Edit the new interface details as follows:
Server Address: your vpn server
Account Name: Your vpn account
Password: Your vpn password
5. Click on the Authentication Settings... button as shown above.
Both the Shared Secret and Group Name should be entered as: netflixvpn
Hit OK and now you should be able to press Connect. This will prompt you for your password and after a successful authentication, you will now be connected to the VPN.


-
How to setup Mac OS X Built-In OPENVPN
Download Tunnelblick From https://tunnelblick.net/downloads.html
Tunnelblick provides free, user-friendly control of OpenVPN client connections for Mac OS.

Launch Tunnelblick When installation finished, Click Quit.

login member center, Download Config Files for netflixvpn FullVPN Network

You may see a dialogue box: Tunnelblick needs to repair ownership/permissions of the program to secure it. Type your password to allow Tunnelblick to make changes. If so, enter your computer’s admininstrator username and password and click OK. Then exit Tunnelblick totally.


Select all Mac OS configuration files and double-click on one (An administrator username and password will be required). By doing this, you will add the servers to the Tunnelblick server list.

Find the Tunnelblick icon in your menu bar (top right). Click on the Tunnelblick icon to bring down the dropdown menu and you will see the list of our servers.
Enter you VPN credentials, mark the box Save in Keychain and click Ok.


You are connected to VPN. To disconnect click on the Tunnelblick icon in your menu bar and select Disconnect from the drop down menu.
-
How to setup Mac OS X Built-In IKEV2 VPN
As an alternative to downloading the IKEV2 VPN client for Mac OS X, you can also use the built in IPSec version found on your machine. This might be more convenient for those who wish to avoid installing additional software.
You will need an Account in order to access the VPN.
1. Head over to your System Preferences and to the Network Settings.
System Preferences > Network

2. Add a New interface.
3. Input the following settings:
Interface: VPN
VPN Type: IKEV2
Service Name: This can be anything, I left the default.
4. Enter Server Address and Server Address as Remote ID. Then click on Authentication Settings.

5. Select Username as Authentication Setting and enter your credentials.

Hit OK and now you should be able to press Connect. This will prompt you for your password and after a successful authentication, you will now be connected to the VPN.
-
How to Setup Cisco AnyConnect Secure Mobility Client VPN in Mac OSX
Mac OS Mojave (10.14) or below is compatible with AnyConnect 4.7.04056 Link to download
Mac OS Catalina (10.15) OS 11 Big Sur beta5 or Latest is compatible with AnyConnect 4.9.03047 Link to download
Find and open the downloaded file.

On the following screen titled Welcome to the AnyConnect Secure Mobility Client Installer, click Continue.

When you get to the Installation Type screen, ensure that only the VPN checkboxes are selected, then continue the installation.

Cisco AnyConnect can be found in the Cisco folder located in the Applications folder. Open the Cisco AnyConnect Security Mobility Client application.
Tap Server Address. (You can find our VPN Server List at member center--nodelist) then tap OK. Tap Done.


Enter your Netflixvpn login account and password, then tap Connect.


You will now be connected to the Netflixvpn service. All your internet activity will be routed securely through the VPN.

-
How to Set up the L2TP VPN connection on Mac OS
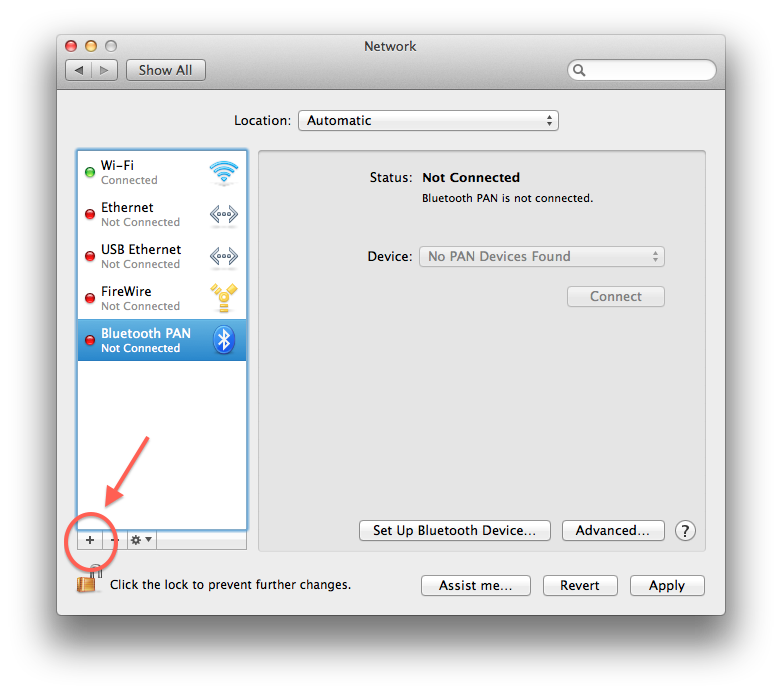
Step 1. Open System Preferences and click onto Network.
.png)
Step 2. Click the + button on the network connections panel.

Step 3. From the drop down menu select VPN followed by L2TP then click Create.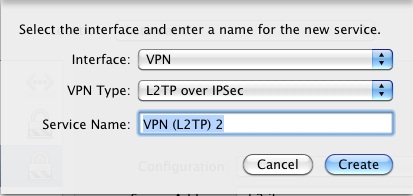
Step 5. Enter the NetflixVPN server that you wish to connect (The Server address will be different, depending on the package you own.
To check all the available servers, please check the member area section) into the Server Address field and your account Username (Email address) in the Account Name field.
Step 6. Click the Authentication Settings and enter your Password (VPN Password from member area) and for Shared Secred input: netflixvpn and then click OK.
Step 7. Click the Advanced button.
Step 8. Tick send all traffic over VPN connection, press OK.
Step 9. Click Apply.
Step 10. Leave the Show VPN status in menu bar box ticked and press Connect.
Step 11. You should be able to Connect/Disconnect to the server from the menu bar.
-
How to Set up the PPTP VPN connection on Mac OS
Step 1. Open System preferences and click onto Network.

Step 2. Click the + button on the network connections pane.

Step 3. From the drop down menu select VPN followed by PPTP then click Create.

Step 4. Enter the NetflixVPN server that you wish to connect (The Server address will be depending on the package you own. To check all the available servers, please check the member area section) input itinto the Server Address field and your account Username (your registered email address) in the Account Name field.

Step 5. Click the Authentication Settings and enter your Password (VPN Password from member area) and click OK.

Click the Advanced button.
Tick Send all traffic over VPN connection, press OK.
Click Apply.
Leave the Show VPN status in menu bar box ticked and press Connect.
You should be able to Connect/Disconnect to the server from the menu bar.

